Mounting a dash cam in the grand scheme of things is very simple. You just decide where you want to place the dash cam, peel the backing off the adhesive, stick it to the windshield and you’re done. See I told you it was easy!
Just kidding, of course there are other things to know besides the physical process of attaching a dash cam to the windshield. While physically mounting a dash cam is easy, knowing how to route the cables if you have never done it before is tough.
In this article I’m going to give you the basics on how to route a cable for your dash cam.
Headliner to “A” Pillar
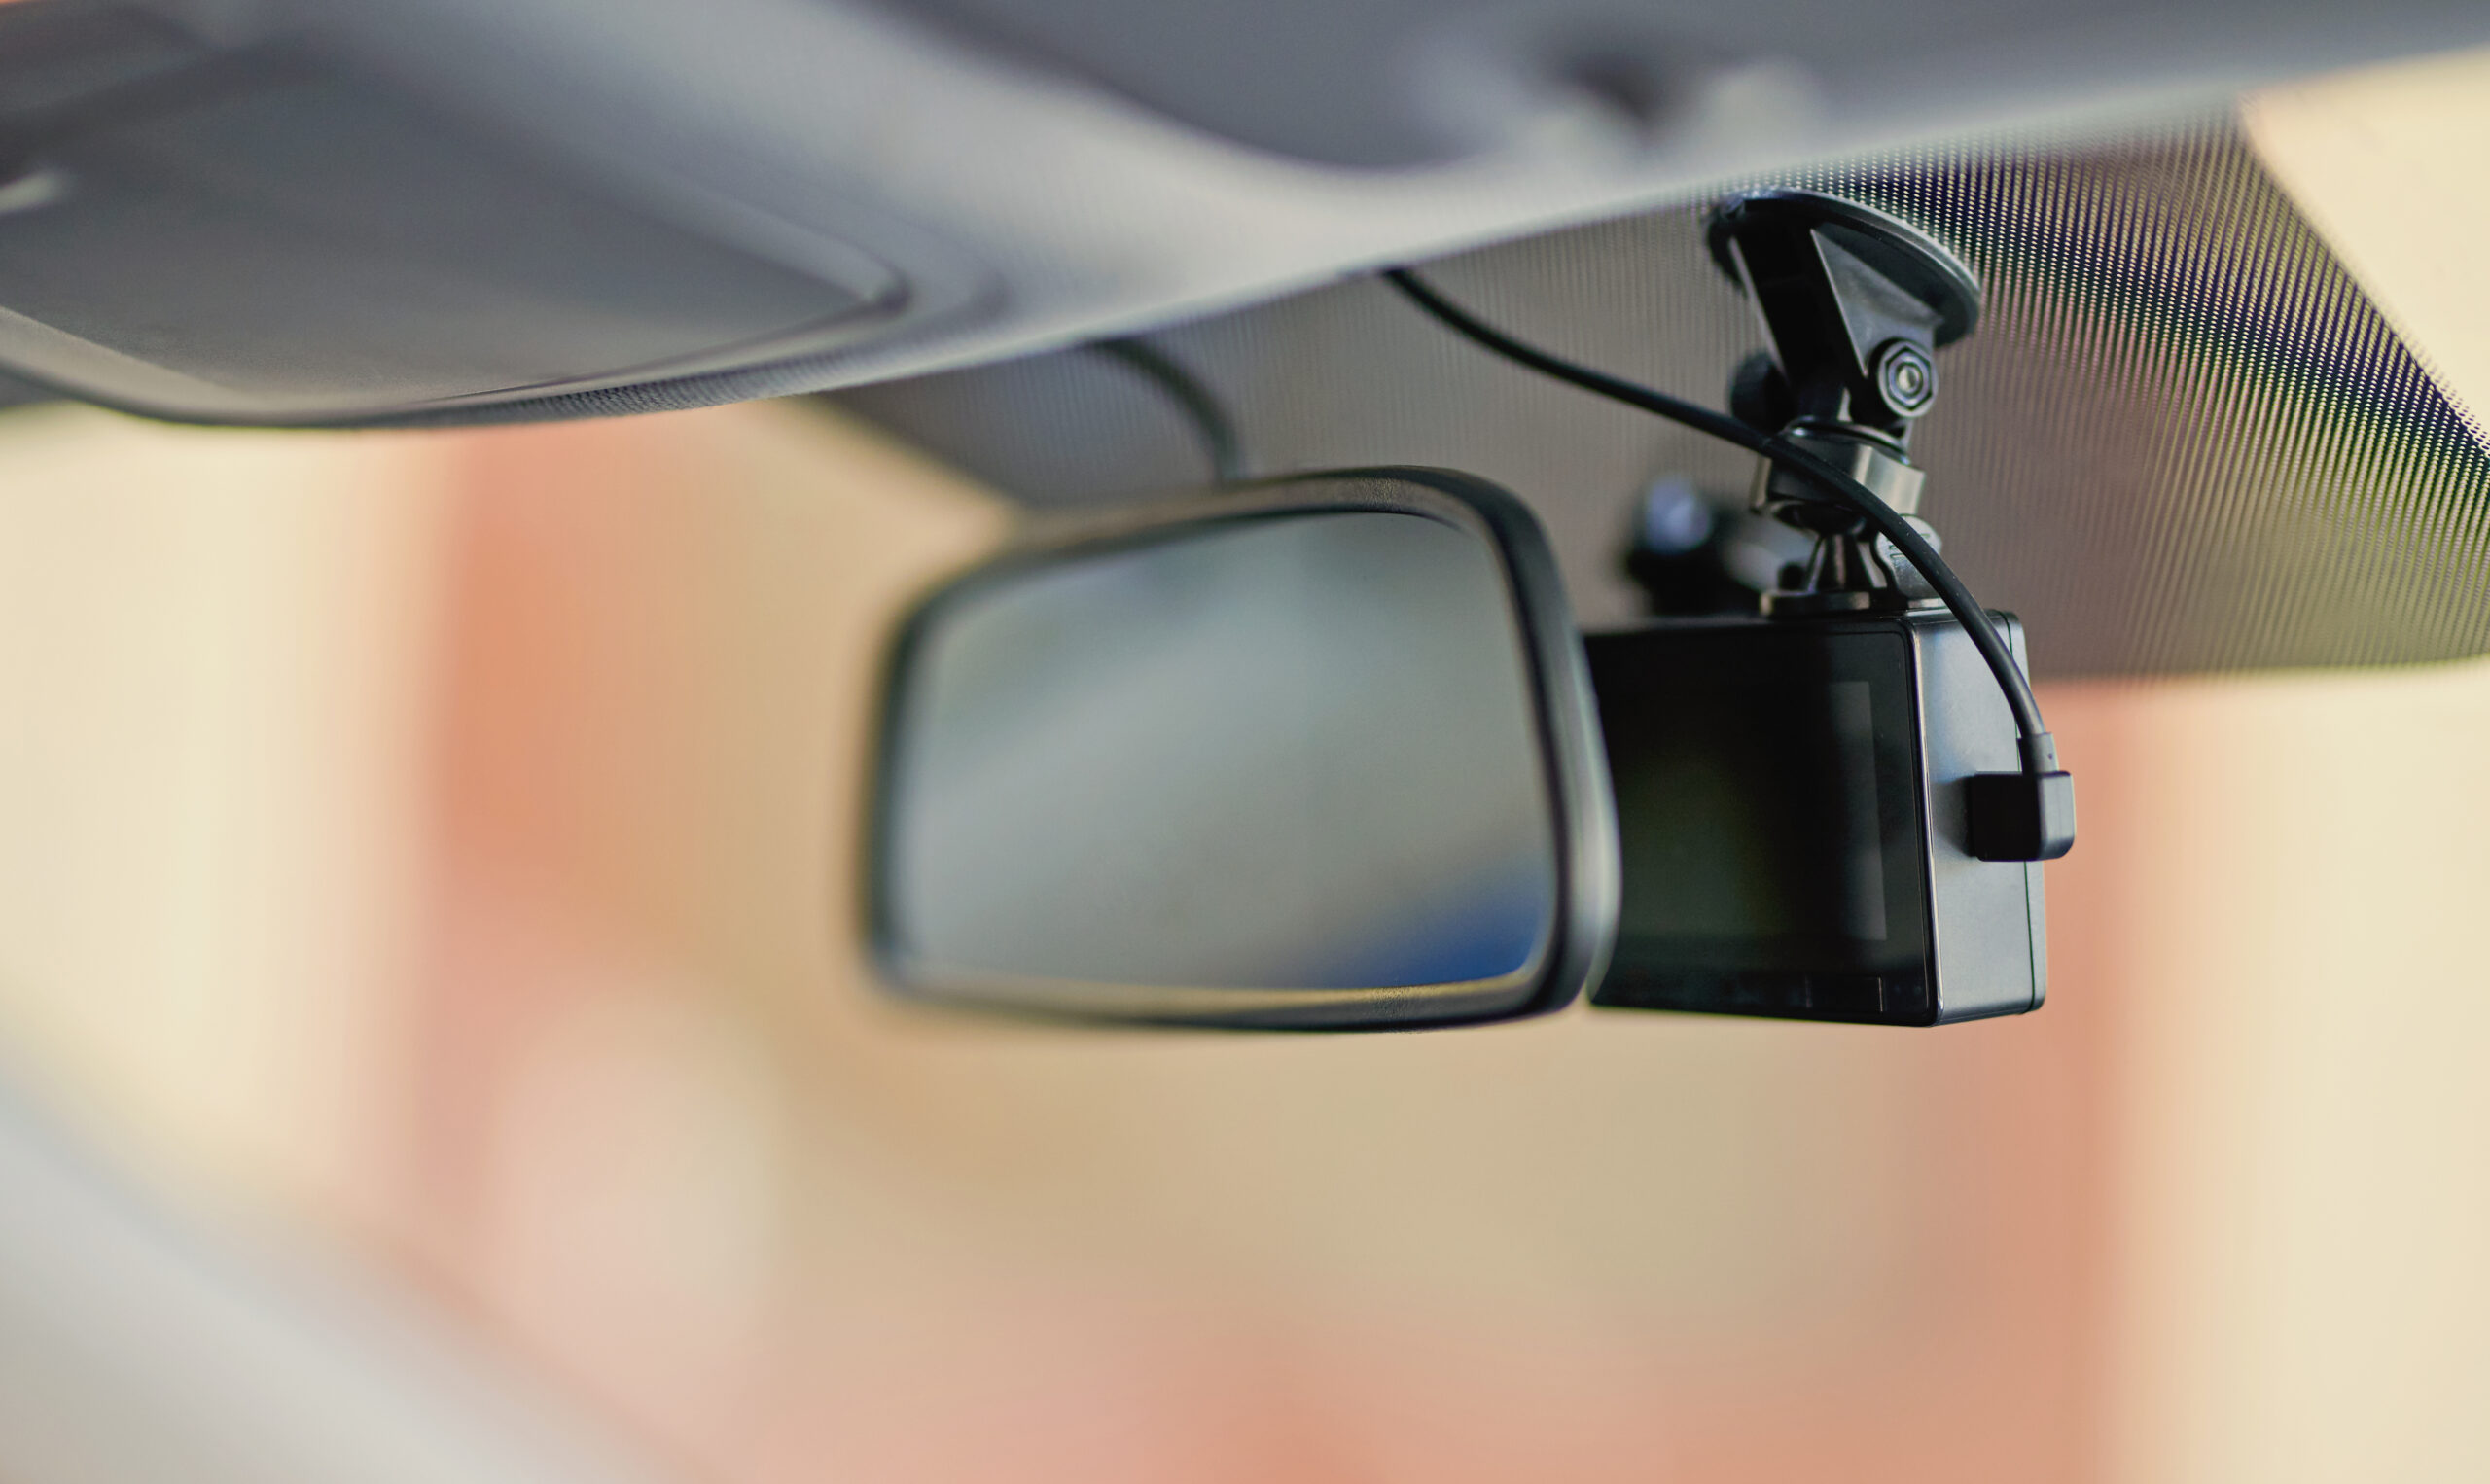
Typically you’re going to install a dash cam on your windshield. This means you need to route the power cable to the dash cam, and rear camera if it’s a two channel system, without obstructing your view or causing a hazard to yourself or your passengers in the event you’re in a crash and your car’s airbags deploy.
The easiest way to route the cable is to it behind your car’s headliner. If you’re not familiar with term “headliner”, then it’s basically your car’s ceiling. Usually it’s pretty easy to pull the headliner down enough where it meets the windshield to slide your dash cam’s power cable into it.
Once you have the cable partially into the headliner, then it’s pretty simple to keep on stuffing the cable into it until you reach either the left or right “A” pillar of your car. The “A” pillars are essentially the posts on your car that your windshield sits between.
Which “A” Pillar to Use? – Depends on Where Your Fuse Box or Cigarette Lighter is Located
You’ll need to determine which “A” pillar to route the cable to in advance. This will largely be determined by whether you’re installing a hardwire kit or you’re just powering it via a car charger plugged into a cigarette lighter port.
If you’re going the hardwire route, then you’ll want to route it down the pillar on the same side as your car’s passenger cabin fuse box. Typically, the passenger cabin fuse box is located either on the driver’s side close to the steering wheel or near the glove box on the passenger side. Your car’s manual should tell you where it’s located.
If you’re powering it via a car charger, then you’ll have to make a determination if it’s going to be easier to route the cable on the passenger side or on the driver’s side.
When I initially installed my dash cam and used the car charger, I chose to go down the passenger side “A” pillar. I chose this route because there seemed to be a lot more space to work with once I pulled the glove box out of my car. If you truly don’t know what would be easier, then you might want to try searching online for “dash cam install ” where you replace with the model of your car.
“A” Pillar Down to Dashboard – Watch Out For Air Bags

Once you’ve got the cable routed to an “A” pillar you will have to route it down the “A” pillar towards your car’s dashboard. However, it’s very important that you don’t just tuck the cable behind the trim of the “A” pillar.
If you do this, then you run the risk of running the cable in front of your car’s side airbags/curtains which could prevent them deploying in the event of a crash. Obviously, not something you want to do.
Basically, you’re going to have to remove the “A” pillar trim in order to see if there are airbags attached to the “A” pillar. If there are airbags, then you’re going to want to run the cable between the “A” pillar and the windshield down to the dashboard.
This will be the side of the “A” pillar the furthest away from the passenger or driver if they were sitting in their seat.
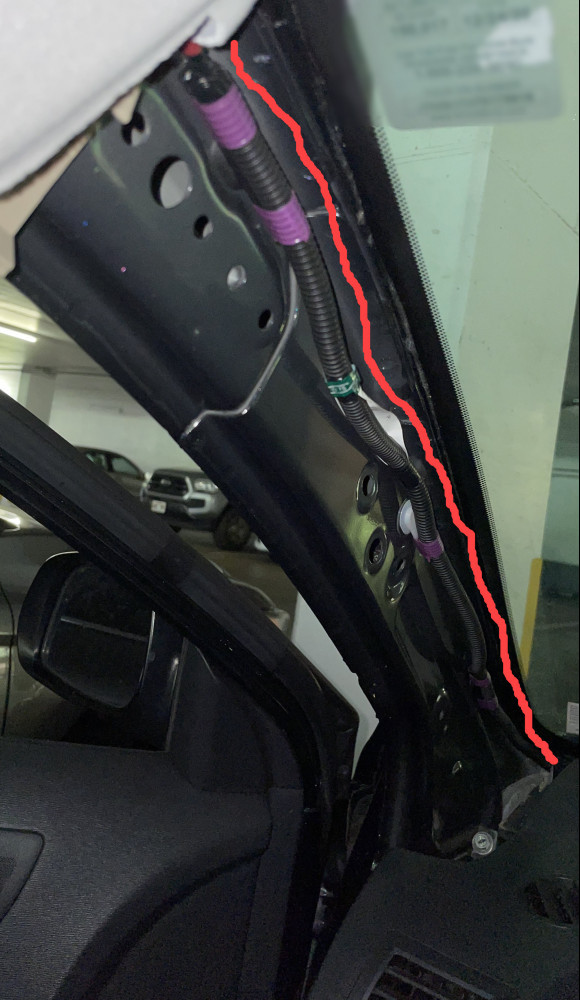
In the picture to the right you’ll see a picture of my car with the driver’s side “A” pillar trim remove. I’ve drawn a red line where I installed the cable for my rear dash cam.
This is the side of the “A” pillar that you will want to run the cable. In my car removing the trim also exposed a space where I could drop the cable down through a gap to get to the fuse box on the driver’s side for hardwiring.
My car doesn’t have airbags attached to the “A” pillar, so I don’t have to worry about routing the cable in front of them.
You DO NOT want to run it on the side of the “A” pillar closest to the passenger or driver. This is because the side airbags/curtains deploy downward to prevent the passenger or driver’s head from slamming into their respective windows.
If you run the cable on this side, then the cable is going to interfere with the deployment of the side airbags/curtains.
Dashboard to fuse box/cigarette lighter
To get from the bottom of the “A” pillar down through the dashboard may require some investigation. For my car, once I pulled the trim off the “A” pillar I could see a gap where I could drop the cable down. This placed the cable under the dashboard on the passenger side.
You can see in the picture from the previous section the hole that is exposed when you remove the “A” pillar.

Once it was under the dashboard, I pulled my glove box out, which is pretty easy to do with my car, and I had access to a space right above the front passenger seat foot well.
There’s a similar gap on the driver’s side of my car that allowed me to drop both the cable for the rear camera and for my hardwire kit when I transitioned the dash camera from being powered by a car charger to my car’s fuse box.
In the above photo, you can see the black cable coming down from the dashboard. I drew a red line next to it to make it easier to spot.
I routed the cable in this void and up to the center console where I plugged it into a car charger and the car charger into the cigarette lighter.
Rear Dash Cam
Mounting a rear dash cam is a very similar process to routing a cable for the front one. You figure out where you want to place it, pull the adhesive backing and stick it onto the rear glass/window. Unfortunately, you’ll most likely have to run a cable from the rear dash cam up to the front one as the rear camera typically receives power from the main unit and sends its video to the main unit to record.
To install this cable you’ll most likely need to remove a lot of your interior trim. You can choose to go up and over in the roof liner or you can route it along the floor of your car like I did mine. If you run the cable in the roof liner, then you’ll need to pay attention to where your airbags are and be careful not to interfere with their deployment.
Routing the cable is going to vary from car to car as well as removal of the interior trim. However, there are lots of people doing all sorts of modifications to their cars and sharing it online. It’s fairly easy to find out how to take apart your cars trim with some online searches.
For illustrative purposes here are some pics showing how I routed the cable to the dash cam in my 2007 Scion tC. Here’s the same pic from above showing the path I routed both the hardwire kit and rear dash cam cable down the driver’s side “A” pillar:
Here’s an image showing the hardwire kit cable and the rear dash cam cable coming from the hole in the dashboard next to the driver’s side “A” pillar going passing through the passenger cabin fuse box. The hardwire kit wire stayed within the fuse box, but the rear dash cam cable keeps going further down into the driver’s seat foot well.

You can see the rear dash cam cable dropping down from the passenger cabin fuse box area into the driver’s seat foot well area. A plastic molding has been removed to expose some electrical connectors. After the cable was routed, the plastic cover was put back into place.

You can see the black rear dash cam cable routed next to the existing cable bundle. There was a plastic cover I had to unhook to gain access to this area. You can see the HK3 hardwire kit in the background as I hadn’t wired it into the fuse box at this point.

You can see dash cam cable continuing to run along the existing OEM cable bundle as it transitions from next to the driver’s seat into the rear passenger seat area.

The rear dash cam cable continues towards the rear of the car. This picture was taken facing the back of the car. The cable passes next to the base of the “B” pillar and continues along inside the void that is normally covered by the interior trim. The trim was removed to route the cable.

The rear dash cam cable continues along the driver’s side rear passenger seat and up the rear wheel well.

The rear dash cam cable continues up behind the “c” pillar trim. It’s held into place by two sticky pads to prevent it from interfering with the rear passenger seat belt mechanism

Here’s a zoomed out picture so you can see the entire area:

This picture was taken from the back of the car facing forward. You can see the hatchback arm. The cable travels up the c pillar towards the top part of the hatchback door on it’s way to a grommet.

Here the rear hatchback grommet has been removed from the hole. The rear dash cam cable is pulled out of the hole in the body where the grommet was previously sitting. A fish tape was pushed through the grommet and the rear dash cam cable taped to it. Not shown is the rear dash cam cable running along the inside of the rear part of the car’s headliner.

The rear dash cam cable routed through the hatchback grommet and coming out of an opening on the hatchback door. The grommet is re-seated both on the frame of the car and the frame of the hatchback door.

The rear dash cam is mounted on a piece of metal wrapped in black electrical tape that is wedged between the hatchback door glass and the metal frame of the door.

Rear dash cam installed with trim back in place:

Conclusion
While there’s a lot more that goes into mounting a dash cam than just placing it on the windshield, you have the internet at your disposal to figure out how to do it. While it’s a simple concept, it can be challenging taking your car apart for the first time. Be patient, give yourself plenty of time, and you’ll figure it out. Having a dash cam in your car is well worth the effort to install it.
Please leave your questions and comments below and I’ll be sure to get back to you.